Core ScanHub user workflows: scan upload, interpretation, review and group processes.
ScanHub
Core User Workflows
Web Browser Platform — scanhub.upscan.com
Introduction
This document defines the Core User Workflows for the ScanHub web platform (scanhub.upscan.com). It serves as the authoritative reference for product, engineering, QA, and clinical teams when building, testing, and validating user-facing functionality.
Each workflow is presented with a defined user, a sequential step-by-step table of user actions and expected system responses, and supporting notes covering preconditions, edge cases, and important UX considerations.
Users & Roles
| Users | Description |
|---|---|
| Individual Learner | A healthcare provider (physician, nurse, midwife, student) using ScanHub independently to complete courses, upload scans, and track personal progress. |
| Group Leader | An instructor, program director, or clinical lead who manages a cohort of learners, reviews their scans, monitors group-level progress, and delivers feedback. |
| Administrator | Institutional admin with access to user management, group configuration, and reporting. Some admin actions are out of scope for these workflows. |
Workflow Summary
| WF# | Workflow | Actor | Key Outcome |
|---|---|---|---|
| WF-01 | Log in to ScanHub | Any user | Authenticated and redirected to Dashboard |
| WF-02 | Dashboard – Individual | Individual Learner | Reviews progress, scans, and quick-links |
| WF-03 | Dashboard – Group Leader | Group Leader | Reviews cohort progress, pending scans |
| WF-04 | Courses | Individual Learner | Completes modules, passes quiz sections, earns completion |
| WF-05 | Use Scan Vault | Learner / Leader | Views, filters, and manages scan history |
| WF-06 | Upload Scans | Individual Learner | Scan uploaded and submitted for review |
| WF-07 | View Pathology Gallery | Individual Learner | Browses and reviews expert cases |
| WF-08 | Use Question Banks | Individual Learner | Practises POCUS knowledge questions |
| WF-09 | Knowledge Challenge | Individual Learner | Completes timed knowledge assessment |
| WF-10 | Interpretation Challenge | Individual Learner | Interprets scan images/clips; reviews feedback |
| WF-11 | Use SageAI | Learner / Leader | Gets AI-validated POCUS educational answers |
|
WF-01 Log in to ScanHub User: Any registered user |
Overview
This workflow covers all paths through the ScanHub login screen at scanhub.upscan.com, including standard email/password login, and the password reset flow.
Preconditions
-
The user has a registered GUSI/ScanHub account.
-
Users have an active internet connection and a supported browser (Chrome, Firefox, Safari, Edge).
Step-by-Step
| # | User Action | Expected Result / System Response |
|---|---|---|
| 1 | Navigate to scanhub.upscan.com in a browser. | The ScanHub login page loads, displaying email/password fields and social sign-in options. |
| 2 | Enter registered email address in the Email field. | Input is accepted; no validation fires until submission. |
| 3 | Enter password in the Password field. | Passwords are masked. A show/hide toggle is available. |
| 4 | Click the Log In button. | System validates credentials. On success, the user is redirected to the Dashboard. On failure, an inline error message appears (invalid credentials). |
| 5 | (Forgot password) Click Forgot Password link. | A password reset form appears, prompting for the registered email address. |
| 6 | (Forgot password) Enter email and submit. | The system sends a password reset email. A confirmation message is displayed on screen. |
| 7 | (Forgot password) Click the reset link in the email. | Browser opens the ScanHub password reset page. Users can enter and confirm a new password. |
| 8 | Enter and confirm the new password, then submit. | Password updated successfully. Users are prompted to log in with the new credentials. |
| Note: First-time users who registered via GUSI website may be prompted to set an initial password before accessing the platform. Users with lapsed subscriptions will receive an appropriate access-restricted message post-login. |
| Edge Cases: Entering incorrect credentials 5+ times may trigger a temporary lockout or CAPTCHA. Expired reset links should display a friendly error and offer to resend the email. |
|
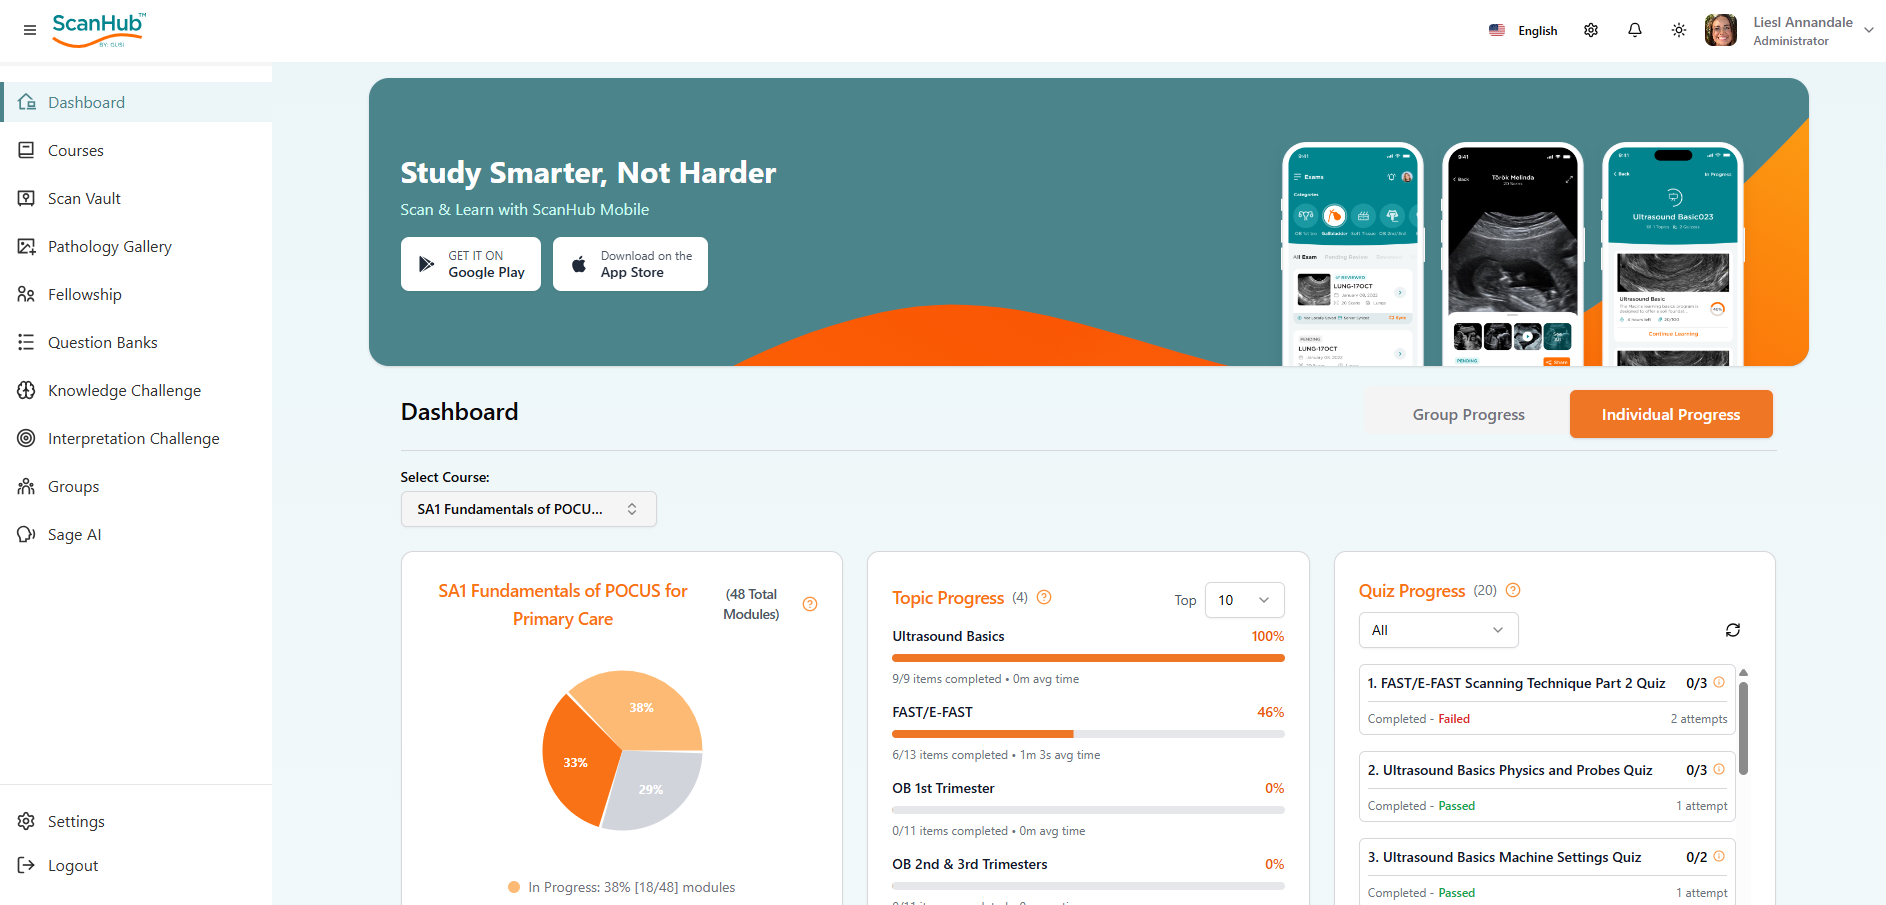
WF-02 Use the Dashboard – Individual Learner User: Individual Learner |
Overview
The Individual Dashboard is the primary home screen for a learner after login. It surfaces enrolled courses, scan submission status, recent activity, performance metrics, and quick-access links to platform features.
Preconditions
-
The user is authenticated as an Individual Learner (not a Group Leader).
-
Users have at least one active course or fellowship enrolment.
Step-by-Step
| # | User Action | Expected Result / System Response |
|---|---|---|
| 1 | Log in to ScanHub (see WF-01). | The user lands on the Dashboard home screen. |
| 2 | Select Course | When enrolled in more than one course, select/search the correct course from the Select Course drop-down menu |
| 3 | The default Performance / Progress metrics widget is for individuals. | Visual charts or progress bars show completion percentages, quiz scores, and scan submission history over time. |
| 4 | Select Course | When enrolled in more than one course, select/search the correct course from the Select Course drop-down menu |
| 5 | Review the My Courses or Enrolled Courses section. | Cards display each enrolled course/fellowship with title, progress percentage, and a Resume or Start button. |
| 6 | Click Resume on a Topic Progress module icon within an in-progress course. | The user is taken directly to the next incomplete module or lesson within that course. |
| 7 | Click on a quiz-progress topic. | The user is taken directly to the module quiz within that course, from where they can review or retake the quiz. |
| 8 | Review the Scan Submission / Activity panel. | Dashboard shows the number of scans submitted, scans pending review, and scans with status feedback available. |
| 9 | Review any announcements or notifications in the notification panel. | System messages, course updates, feedback alerts, and instructor notes are listed chronologically. |
| 10 | Click on the user avatar or profile menu (top right). | Dropdown reveals Profile, Settings, Subscription, and Log Out options. |
| Note: Dashboard content is dynamically populated based on the user’s enrolled courses and group membership. Users not yet enrolled in any course will see an empty state with a prompt to browse available courses. |
|
WF-03 Use the Dashboard – Group Leader User: Group Leader |
Overview
The Group Leader Dashboard extends the individual view with cohort management capabilities: tracking learner progress, reviewing submitted scans, and monitoring group-level completion and performance metrics.
Preconditions
-
Users have been granted Group Leader status for at least one group.
-
At least one learner is assigned to the group.
Step-by-Step
| # | User Action | Expected Result / System Response |
|---|---|---|
| 1 | Log in to ScanHub (see WF-01). | The user lands on the Dashboard. A Group Leader panel or tab is visible alongside the personal learner view. |
| 2 | Navigate to the Group / Cohort panel. | A list of learners in the group is displayed with name, enrolment status, scans submitted, and last active date. |
| 3 | Select Group | When enrolled as a GL in more than one group, select/search the correct group from the Select Group drop-down menu |
| 4 | Select Sub-Group | When more than one group is enrolled within a group, select/search the correct sub-group from the Select Sub-Group drop-down menu |
| 5 | Select Course | When Sub-groups are enrolled in more than one course, select/search the correct course from the Select Course drop-down menu |
| 6 | Review the selected group Courses section. | Cards display each enrolled group/fellowship with title, group progress percentage, and an individual group member progress matrix. |
| 7 | Click on an individual learner’s name or row. | A detailed view of that learner’s activity opens: course progress, scan history, quiz scores, and pending items. |
| 8 | Review the Pending Scans section. | A list of scans submitted by group members awaiting review is shown, sorted by submission date. |
| 10 | Review the Group Progress metrics widget. | Aggregate charts display overall group completion rate, average quiz scores, total scans submitted vs. target, and individual outliers. |
| 11 | Filter the group list by status (e.g., Active, Inactive, Behind). | The learner list filters accordingly, allowing targeted follow-up. |
| 12 | Export or copy group progress data (if available). | A CSV or report download is triggered with current group metrics. |
| Note: Group Leaders retain access to their own individual learner dashboard. The dual view should be clearly separated in the UI. If a Group Leader is also enrolled in a fellowship as a learner, their personal progress is tracked independently. |
| Edge Cases: A Group Leader with no pending scans to review should see a clear empty state. Groups with more than 20 learners should paginate the learner list. |
|
WF-04 Navigate Courses & Complete Quiz Sections User: Individual Learner |
Overview
This workflow covers how a user accesses an enrolled course, navigates through its topic and module structure, consumes learning content (video lessons, reading material, embedded resources), and completes in-course quiz sections. It also covers progress tracking and returning to a partially completed course.
Preconditions
-
The user is authenticated and has at least one active course or fellowship enrolment.
-
The enrolled course has at least one module or topic published and available.
Part A — Accessing and Navigating a Course
| # | User Action | Expected Result / System Response |
|---|---|---|
| 1 | Log in to ScanHub (see WF-01) and arrive at the Dashboard. | Dashboard displays enrolled course cards with title, progress percentage, and a Start or Resume button. |
| 2 | Navigate to Courses | The courses landing page opens, displaying all enrolled courses tiles |
| 3 | Click Resume (or Start) on the desired course card. | The course landing page opens, displaying the course title, description, total modules, estimated duration, and overall completion progress bar. |
| 4 | Review the course outline / table of contents in the left-hand sidebar or content panel. | A structured list of Topics and Modules is shown. Each item displays its title and a status icon: Not Started, In Progress, or Completed. |
| 5 | Click on a Topic heading to expand it. | The topic expands to reveal its constituent modules (lessons, readings, quizzes). Locked modules (if sequential gating is enabled) are visually marked as locked. |
| 6 | Click on the first available (unlocked) module. | The module content view loads in the main content area. The sidebar highlights the active module. |
| 7 | Consume the module content: watch a video lesson. | The video player loads inline. Controls include play/pause, volume, playback speed, and full-screen. Progress is tracked; the module is not marked complete until the video reaches a defined watch threshold. |
| 8 | Scroll down to review supplementary reading material or embedded resources (PDFs, images, external links) below the video. | Reading material renders inline. Downloadable resources (e.g., pocket guides, reference sheets) provide a download link. |
| 9 | After consuming content, click the Mark as Complete or Next button. | The module is marked as Completed in the sidebar (green tick or equivalent). The system advances to the next module automatically or prompts the user to proceed. |
| 10 | Continue navigating through modules using the Next and Previous navigation buttons. | Each click advances or retreats one module. The sidebar updates the active position. Progress percentage on the course card updates. |
| 11 | Exit the course mid-way by navigating away or closing the browser. | Progress is auto-saved at the module level. On returning to the course, the user is offered a Resume prompt that returns them to the last active module. |
Part B — Completing a Quiz Section
Quiz sections appear at the end of topics or modules as a comprehension check. They are distinct from standalone Question Banks (WF-07) and Knowledge Challenges (WF-08) — they are embedded within the course flow and may gate progression to the next topic.
| # | User Action | Expected Result / System Response |
|---|---|---|
| 1 | Reach a Quiz module in the course outline (identified by a quiz or assessment icon) and click on it. | The quiz introduction screen loads, showing: quiz title, number of questions, estimated time, any passing score requirement, and a Start Quiz button. |
| 2 | Click Start Quiz. | The first quiz question is displayed. Questions may be multiple-choice (single or multi-select), image-based (with an embedded scan or diagram), or true/false. |
| 3 | Read the question and select an answer option. | The selected option is visually highlighted. For multi-select questions, multiple options may be toggled. |
| 4 | Click Next or Submit Answer. | Behaviour depends on quiz mode: Immediate feedback mode: correct/incorrect is shown at once with a brief explanation before advancing. End-of-quiz mode: answer is recorded silently and the next question loads without feedback. |
| 5 | For image-based questions: examine the displayed scan image or video clip before selecting an answer. | The image is displayed at sufficient resolution. A zoom or full-screen option is available. Video clips have playback controls. |
| 6 | Continue answering all questions and reach the final question. | A Submit Quiz or Finish button appears after the last question is answered. |
| 7 | Click Submit Quiz. | The quiz results screen loads showing: total score, pass/fail status (if a threshold is set), percentage correct, and time taken. |
| 8 | Review the per-question breakdown on the results screen. | Each question is listed with the user’s answer, the correct answer, and the explanation. Incorrect answers are highlighted. |
| 9 | If the quiz is failed (score below passing threshold) and retakes are permitted: click Retake Quiz. | The quiz restarts from question 1. Previously selected answers are cleared. Question order may be randomised on retake. |
| 10 | If the quiz is passed (or no passing threshold is set): click Continue or Proceed. | The quiz module is marked as Completed. The next module in the course unlocks. The user is advanced to the next module automatically or prompted to continue. |
Part C — Tracking Course Completion
| # | User Action | Expected Result / System Response |
|---|---|---|
| 1 | Return to the course landing page at any point during the course. | Overall progress bar reflects current completion percentage, calculated across all completed modules and passed quiz sections. |
| 2 | Review the module checklist in the sidebar. | Each module shows its individual completion status. Quizzes that have been passed show score alongside the completion tick. |
| 3 | Complete all modules and quizzes in the course. | Course progress reaches 100%. A course completion banner or modal is displayed, congratulating the user. |
| 4 | Access the completion certificate or CME/CPD credit record (if applicable). | A Download Certificate button or link to the credential record is presented. Certificate PDF is downloadable. |
| 5 | Return to the Dashboard. | The course card on the Dashboard now shows Completed status. The completion date is recorded in the user’s profile and progress history. |
| Sequential vs. Free Navigation: Some courses enforce sequential gating – a module only unlocks once the prior module is completed and its quiz passed. Others allow free navigation. The course configuration determines this behaviour; it should be clearly indicated on the course landing page before the user begins. |
|---|
| Quiz Retake Policy: Retake limits, cooldown periods, and whether previous attempts are visible to Group Leaders are course-level configuration settings. These should be surfaced to the user on the quiz introduction screen before they start. |
| Fellowship Courses: For fellowship tracks (POCUS Essentials Fellowship, OB Fellowship, etc.), quiz scores and module completion contribute directly to competency milestones tracked on the Group Leader Dashboard. The minimum passing score for fellowship quizzes must be enforced by the platform and clearly labelled in the quiz UI. |
|
WF-05 Use Scan Vault User: Individual Learner / Group Leader |
Overview
Scan Vault is the cloud-based repository where users store, organise, and review their uploaded ultrasound scans. Learners can view their submission history, see instructor feedback, and manage scan metadata. Group Leaders can access all scans submitted by members of their cohort.
Preconditions
-
The user is authenticated.
-
The user has previously uploaded at least one scan (or is accessing as a Group Leader with group scans available).
Step-by-Step
| # | User Action | Expected Result / System Response |
|---|---|---|
| 1 | From the Dashboard or navigation menu, click ScanVault. | Scan Vault loads, displaying a list or grid of all scans associated with the user’s account. |
| 2 | Review the scan list. Observe status badges (Pending, Reviewed, Needs Resubmission). | Each scan card/row displays: thumbnail or file type icon, scan title, date uploaded, associated course or exam, and status. |
| 3 | Use the search bar to find a specific scan by name, date, or exam type. | Scan list filters in real-time to match the query. |
| 4 | Use the filter controls to narrow by status, date range, or course. | Scan list updates to reflect selected filters. |
| 5 | Click on a scan to open it. | Scan detail view opens: video/image playback, scan metadata (date, machine used if entered, exam type), and the feedback panel. |
| 6 | Review feedback in the feedback panel (if scan has been reviewed). | Instructor feedback is displayed with a timestamp and reviewer name. Any quality rating or competency tags are shown. |
| 7 | Click Edit or the pencil icon on a scan (if within the edit window). | Users can update scan titles, add notes, or change exam type metadata. |
| 8 | Click Delete on a scan. | A confirmation dialog appears. On confirmation, the scan is permanently removed from ScanVault. |
| 8a | (Group Leader) Switch to the Group Scans view. | All scans submitted by group members are listed with a learner name column added. Group Leader can filter by learner. |
| Note: Scan Vault is separate from the upload flow (see WF-05). Scans uploaded via the ScanOne mobile app are automatically synced to Scan Vault on the web platform. |
|
WF-06 Upload Scans User: Individual Learner |
Overview
Users upload ultrasound scan files (video clips or images) directly from the ScanHub web platform to associate scans with a course, exam, or free-form submission for instructor review.
Preconditions
-
The user is authenticated and has an active enrollment.
-
Users have scan files available on their device (accepted formats → Image: (JPEG, JPG, PNG, GIF, WEBP, BMP, SVG) or Video: (MP4, WEBM, MOV, AVI, MKV)
Step-by-Step
| # | User Action | Expected Result / System Response |
|---|---|---|
| 1 | From the Dashboard or Scan Vault, click Upload Scan or the + New Scan button. | The scan upload modal or page opens. |
| 2 | Select the associated course, fellowship module, or exam type from the dropdown. | The selected context is confirmed. Some courses may require specific exam types. |
| 3 | Enter required metadata: Scan Title, Exam Type (e.g., FAST, OB, Cardiac), and optional notes. | Form fields populate. Mandatory fields are validated before upload proceeds. |
| 4 | Click Choose File or drag and drop a file into the upload area. | File picker opens (or drag target activates). Selected file name and size are previewed. |
| 5 | Confirm file selection and click Upload. | An upload progress bar is displayed. The file transfers to the GUSI cloud PACS. |
| 6 | Wait for upload completion. | On success, a confirmation message appears. The scan appears in Scan Vault with status Pending Review. |
| 7 | (Optional) Add a second scan to the same submission. | If the course allows multi-scan submissions, an Add Another Scan option is available. |
| 8 | Submit the scan for instructor review. | Scan status transitions from Draft to Pending Review. The assigned Group Leader or reviewer is notified. |
| File Requirements: Maximum file size: 200MB. Supported video formats: MP4, MOV. Supported image formats: JPEG, JPG, PNG, GIF, WEBP, BMP, SVG or Video: MP4, WEBM, MOV, AVI, MKV. |
| Edge Cases: If an upload fails mid-transfer, a Re-upload option should be presented on the failed scan entry in Scan Vault. Users should not lose their metadata entries on upload failure. |
|
WF-07 View the Pathology Gallery User: Individual Learner |
Overview
The Pathology Gallery provides a curated, searchable library of expert-annotated ultrasound images and clips demonstrating normal anatomy and pathological findings across POCUS exam types. It is used for self-directed learning and case review.
Preconditions
-
The user is authenticated with an active ScanHub subscription.
Step-by-Step
| # | User Action | Expected Result / System Response |
|---|---|---|
| 1 | From the navigation menu, click Pathology Gallery. | The gallery page loads, displaying a grid or list of categorised case thumbnails. |
| 2 | Browse top-level categories (e.g., Cardiac, OB/GYN, FAST, MSK, Pulmonary, Vascular). | Category filters or tabs are displayed. Selecting a category narrows the visible cases. |
| 3 | Use the search sub-categories for a specific pathology (e.g., pericardial effusion, placenta previa). | Gallery filters to show cases matching the search term. Results may include title, tags, and exam type. |
| 4 | Click on a case thumbnail. | Case detail view opens with the scan image/video, expert annotations or overlays, and a written description of the pathological finding. |
| 5 | Play the video clip (if applicable). | Video plays inline. Playback controls (play, pause, scrub) are available. |
| 6 | Review annotations and the case description. | Annotated structures are labelled on the image. The description explains the clinical significance and key image features. |
| 7 | Navigate to the next or previous case using arrow controls. | The next/previous case in the current filtered set loads without returning to the gallery grid. |
| Note: The Pathology Gallery is read-only for learners. Content is curated and updated by GUSI clinical staff. Gallery access may be gated by course enrolment tier — confirm current access rules with product. |
|
WF-08 Use Question Banks User: Individual Learner |
Overview
Question Banks allow users to practise POCUS knowledge through structured multiple-choice and image-based questions. Users can filter by category, track their performance history, and use question banks in both timed and untimed modes.
Preconditions
-
The user is authenticated with active access to the Question Bank feature.
Step-by-Step
| # | User Action | Expected Result / System Response |
|---|---|---|
| 1 | From the navigation menu, click Question Banks. | The Question Bank home page loads with available banks listed (e.g., POCUS Essentials, OB, Emergency, MSK). |
| 2 | Select a question bank to access. | The bank detail page shows total questions, topics covered, user’s previous performance (if any), and a Start / Resume button. |
| 3 | Configure session settings: number of questions, topic filter, timed or untimed mode. | Settings form updates the session parameters. A question count preview reflects the selection. |
| 4 | Click Start Session. | The first question is displayed with answer options (A–D). For image-based questions, a scan image or clip is shown above the options. |
| 5 | Select an answer option and click Submit / Next Question.. | The following question in the session loads. Progress indicator (e.g., Question 3 of 20) updates. No immediate feedback is shown (results are revealed at end). |
| 6 | Complete all questions in the session. | End-of-session results screen displays: total score, percentage correct, breakdown by topic, and questions answered incorrectly with correct answers. |
| 8 | Click Review Incorrect Answers. | The user is taken through only the questions answered incorrectly, with answers and explanations displayed. |
| 9 | Click Back to Question Banks to return to the Question Bank home. | Session progress is saved. Next time the user enters this bank, they can resume or start a new session. |
| 10 | Or click on Restart Quiz to retake the quiz. | The user is taken to the 1st question of the Question Bank. |
| Note: Question bank performance data feeds into the personal Dashboard metrics. For fellowship users, required minimum scores may be tracked against course completion criteria. |
|
WF-09 Use Knowledge Challenge User: Individual Learner |
Overview
Knowledge Challenge is a timed, gamified knowledge-testing feature. Users answer a series of questions within a set time limit, competing for performance rankings or personal bests. It is distinct from Question Banks in that it is structured, scored, and may contribute to fellowship competency milestones.
Preconditions
-
The user is authenticated with access to Knowledge Challenge.
-
The user has reviewed relevant course material or question banks prior to attempting.
Step-by-Step
| # | User Action | Expected Result / System Response |
|---|---|---|
| 1 | From the navigation menu or Dashboard, click Knowledge Challenge. | Knowledge Challenge home loads with available challenge sets listed by topic or course module. |
| 2 | Select a challenge to attempt. | Challenge detail page displays: Select a Course, Question Category, and Question Type to start the challenge. A pop-up welcome note prompts the user to start the challenge. |
| 3 | Click Start Challenge. | A countdown timer begins. The first question is displayed with answer options. |
| 4 | Select an answer and click Next (or allow auto-advance). | Answer is recorded. The timer continues running. Immediate feedback is shown (results are revealed with each question). |
| 5 | Continue answering questions until the challenge is complete or time expires. | All answered questions are submitted. If time expires mid-challenge, remaining questions are marked as unanswered. |
| 6 | View the end-of-challenge results screen. | Score, percentage, time taken, and a per-question breakdown are displayed. Correct answers and explanations are shown. |
| 7 | Review the leaderboard or personal history (if available). | Users can see their ranking relative to other learners, or their own score progression over attempts. |
| 8 | Click Retake Challenge or Return to Menu. | Users can attempt the challenge again (subject to any cooldown rules) or navigate back to the challenge list. |
| Note: Knowledge Challenge results may be visible to Group Leaders on the group dashboard. Passing thresholds, if applicable to a fellowship track, should be clearly communicated on the challenge detail page before the user begins. |
|
WF-10 Use Interpretation Challenge User: Individual Learner |
Overview
Interpretation Challenge presents users with real or curated ultrasound clip/image cases and asks them to interpret findings, identify structures, or make a provisional diagnosis. It is the image-based counterpart to Knowledge Challenge, designed to build scan interpretation confidence.
Preconditions
-
The user is authenticated with access to the Interpretation Challenge feature.
-
Browser supports video playback (required for clip-based cases).
Step-by-Step
| # | User Action | Expected Result / System Response |
|---|---|---|
| 1 | From the navigation menu or Dashboard, click Interpretation Challenge. | Interpretation Challenge home loads with available case sets, filtered by topic or difficulty. |
| 2 | Select a challenge set (e.g., Cardiac Views, OB First Trimester, FAST Exam). | Challenge detail page displays: Select a Course, Question Category, and Question Type to start the challenge. A pop-up welcome note prompts the user to start the challenge. |
| 3 | Click Start Challenge. | The first case loads: an ultrasound image or video clip is displayed prominently. |
| 4 | Play the clip or examine the image. | Playback of clip or image displayed.. |
| 5 | Answer the interpretation question (e.g., MCQ: identify the structure; or free text: describe the finding). | Answer input is accepted. Timer (if enabled) continues. |
| 6 | Submit the answer and proceed to the next case. | Immediate or deferred feedback is shown depending on challenge mode. The next case loads. |
| 7 | Complete all cases in the challenge. | Results screen displays: score, per-case breakdown, correct interpretations with annotated expert images for comparison. |
| 8 | Review expert annotations on missed cases. | Annotated versions of each case are shown side-by-side with the user’s answer and the correct interpretation. |
| 9 | Save or share the results (if available), then click Exit. | Progress is saved. The user is returned to the Interpretation Challenge home. |
| Note: Interpretation Challenge cases are drawn from the same library as the Pathology Gallery where possible, providing cross-feature consistency. Cases should be tagged to POCUS competency domains so results map to fellowship progress tracking. |
|
WF-11 Use SageAI User: Individual Learner / Group Leader |
Overview
SageAI is GUSI’s AI-powered POCUS knowledge assistant. It provides instant, expert-validated answers to clinical and educational POCUS questions, available 24/7 within the ScanHub platform. SageAI is scoped exclusively to ultrasound education and clinical POCUS — it is not a diagnostic tool and should not be used to guide patient care.
Preconditions
-
The user is authenticated with active ScanHub access.
-
Users understand that SageAI responses are for educational purposes only, not patient diagnosis.
Step-by-Step
| # | User Action | Expected Result / System Response |
|---|---|---|
| 1 | From the navigation menu or Dashboard, click SageAI. | The SageAI chat interface opens with a conversation area and a text input field. |
| 2 | Review the disclaimer or scope notice (if present) and acknowledge it. | If a first-use disclaimer is shown, the user acknowledges it. The input field becomes active. |
| 3 | Type a POCUS-related question into the input field (e.g., “What are the key features of a pericardial effusion on POCUS?”). | Input is accepted. A Send button or Enter keypress triggers submission. |
| 4 | Submit the question. | SageAI processes the question and streams a response. A loading indicator is shown while the answer is generated. |
| 5 | Read the SageAI response. | A structured, expert-validated answer is displayed, which may include: explanation text, key image features, clinical context, and references to relevant GUSI course content. |
| 6 | Ask a follow-up question to drill deeper into the topic. | SageAI maintains conversational context within the session and provides a contextually relevant follow-up answer. |
| 7 | Click a suggested topic link or course reference within the SageAI response (if available). | The user is navigated directly to the relevant ScanHub course module, Pathology Gallery case, or resource. |
| 8 | Start a new conversation by clicking New Chat or Clear. | Conversation history is cleared. A fresh session begins. |
| 9 | Exit SageAI by navigating to another section. | The conversation is saved to the session or history (if history is supported). Users can return to review previous sessions. |
| Important – Scope Limitation: SageAI is strictly an educational tool for POCUS learning. It is NOT intended for real-time clinical decision support or patient diagnosis. This limitation must be clearly communicated in the UI at all entry points to SageAI. |
| Note: Response quality depends on the question being within the POCUS educational domain. Out-of-scope questions (e.g., general medicine, non-ultrasound topics) should return a graceful redirect message rather than hallucinated content. |
Appendix A — Workflow Summary
| WF# | Workflow | Actor | Key Outcome |
|---|---|---|---|
| WF-01 | Log in to ScanHub | Any user | Authenticated and redirected to Dashboard |
| WF-02 | Dashboard — Individual | Individual Learner | Reviews progress, scans, and quick-links |
| WF-03 | Dashboard — Group Leader | Group Leader | Reviews cohort progress, pending scans |
| WF-04 | Courses | Individual Learner | Completes modules, passes quiz sections, earns completion |
| WF-05 | Use Scan Vault | Learner / Leader | Views, filters, and manages scan history |
| WF-06 | Upload Scans | Individual Learner | Scan uploaded and submitted for review |
| WF-07 | View Pathology Gallery | Individual Learner | Browses and reviews expert cases |
| WF-08 | Use Question Banks | Individual Learner | Practises POCUS knowledge questions |
| WF-09 | Knowledge Challenge | Individual Learner | Completes timed knowledge assessment |
| WF-10 | Interpretation Challenge | Individual Learner | Interprets scan images/clips; reviews feedback |
| WF-11 | Use SageAI | Learner / Leader | Gets AI-validated POCUS educational answers |
Global Ultrasound Institute · CTP-617 · ScanHub Core User Workflows · v1.0